First run of my loco

I am building a live steam loco. It’s a kit from Roundhouse Engineering, and it’s relatively straightforward to build. Last weekend I lit the burner for the first time, raised steam and tested to see if it would run.

Roundhouse “Billy” kit steam up 25 October 2020

The black vertical tank at the back is the gas tank, and contains gas – basically the same stuff as Camping Gaz. There is a wheel to control how much gas flows out of the tank into the burner, which runs in a tube in the middle of the boiler.

The boiler (the large horizontal copper tube) is mostly filled with water, and has another smaller tube within it containing the burner (so that the burner doesn’t get wet). The burner heats up the boiler, heating up the water, producing steam. The steam gathers at the top of the boiler, building up pressure.

The regulator controls how much of that steam is sent to the pistons (at the front, via an internal pipe that you can’t see). The reversing lever moves the mechanisms at the side – “valve gear” – to determine if the loco goes forwards or backwards.

The safety valve correctly operates when there is too much pressure in the boiler, preventing the boiler from exploding. In the second run, the loco moves. The motion is jerky because the valve gear it hasn’t been properly “tuned”, and the loco hasn’t been run in yet. Running in requires running the loco on the track, or raised up on blocks, for several hours.

Posted in 16mm, Garden Railways, Trains | Comments Off on First run of my loco

Help me understand the British Political System

An American friend asked me today, the day after the 2019 UK General Election:

"I was wondering if you could please help me understand the 
current news on the election? If I am understanding what I 
am reading it would appear that the Prime Minister has the 
ability to effectively fire (sack) everyone and then every 
position has be to voted on again?"

I think it might be useful to explain some background to our archaic system of Government.

Great Britain traces its system of legislature back to William the Conqueror (1066) and the Magna Carta (1215), which formalised the relationship between the King and the Parliament of England. It was originally made up of rich landowners and senior authorities in the church. The House of Lords (the Upper House) is still today made up of Lords Spiritual (e.g. bishops) and Lords Temporal (landowners and those chosen by the House). The Parliament of the United Kingdom developed through the unions of England with Wales (1535), Scotland (1707), and Ireland (1801).

The House of Commons (the Lower House) was established in the 14th century, formed of representatives of major towns and cities. This is more or less the same today. Each Member of Parliament (MP), represents a “constituency” (a city, town, or geographical area), and also represents a political party including Conservative, Liberal Democrats, Labour, the Scottish National Party, Plaid Cymru (Welsh), Independents and others. At the present time the House of Commons is made up of 650 MPs. See this article at the BBC with a map of the constituencies for 2019.

Because each of these MPs represents a local area, each is voted on locally, which is what we, the British people, did yesterday. For example in St. Albans, our ballot papers included five names: the existing MP Anne Main (Conservative), Daisy Cooper (Lib. Dem.), Rebecca Lury (Labour), Simon Grover (Green) and Jules Sherrington (Ind). The vote follows a “first past the post” system: we vote for one candidate by marking an X on the box next to their name on a voting paper, and the one with most votes is the winner. In St. Albans, Anne Main lost the vote to Daisy Cooper – so to partly answer the question, Anne Main is out of a job after 14 years, and Daisy Cooper will have to give up her existing day job to become our new MP. Losing one’s seat wasn’t such a big deal in the days when MPs weren’t paid (their land income would generate their wealth instead).

The political party with the most MPs (the most “seats” in the House of Commons) can form Her Majesty’s Government. If they have less than half the House, there are other rules (BBC article from 2010), but we rarely have coalition governments.

Our system is a constitutional monarchy: the king or queen, whilst head of state, delegates political decision-making to their government. So on 6th November 2019, Boris Johnson formally asked the Queen to dissolve parliament (after gaining a majority among MPs to do so). Technically, MPs cease to be MPs as soon as parliament is dissolved (but they are still paid until the election 25 days later). And on December 13th, the day after the election, the Prime Minister asked the Queen if he may form her Government. The Queen does not vote, but she does have the authority to sack the Prime Minister (last exercised in 1834 by King William IV). She meets weekly with the PM and offers counsel.

Boris Johnson is still Prime Minister today after the election because (a)
he didn’t lose his seat, and (b) his party won enough seats, and (c) he is the leader of the Conservative Party (based on an internal election within the Conservative Party earlier this year).

So back to your questions. “does the Prime Minister have the ability to effectively sack everyone“. Not directly. He cannot choose who is a member of the Conservative Party, but he can choose who forms his Cabinet (the inner circle of 22 ministers who are the heads of various departments like finance, transport, health, military etc.). Calling a General Election may have an impact on the jobs of some MPs, and for some, it is devastating.

The other question “and then every position has to be voted on again“. In this election, 112 of the 650 constituencies delivered a different party. It is unusual for us to have a General Election so soon after the previous one (where 73 seats were changed) – Our elections are normally about every 5 years. There was hope in some circles that Boris Johnson himself would lose his seat in Uxbridge, which would have been the first time a sitting Prime Minister lost their seat at a general election. But he won the constituency against some very interesting characters (including Lord Buckethead, and Count Binface.

Although it appears normal from a British perspective, I believe that we indeed have a very strange and archaic form of government (hardly surprising for a very strange sort of country). Our Parliament has been around for a while, there are plenty of things wrong with it, but it’s the least bad sort of government that we could come up with, and it has stood the test of time.

Posted in Uncategorized | Tagged , | Comments Off on Help me understand the British Political System

Starlock Washers

Long ago, I promised myself that I would build a steam loco. Progress is slow, but it is steadily progressing. The loco I am building is a kit from Roundhouse Engineering, and it has nice clear instructions. By the end of October, I had built the chassis and was starting with the valve gear. This loco uses a variant of Walschaerts Valve Gear. I still haven’t quite understood how valve gear works, but I’m hoping that by building it, enlightenment will happen.

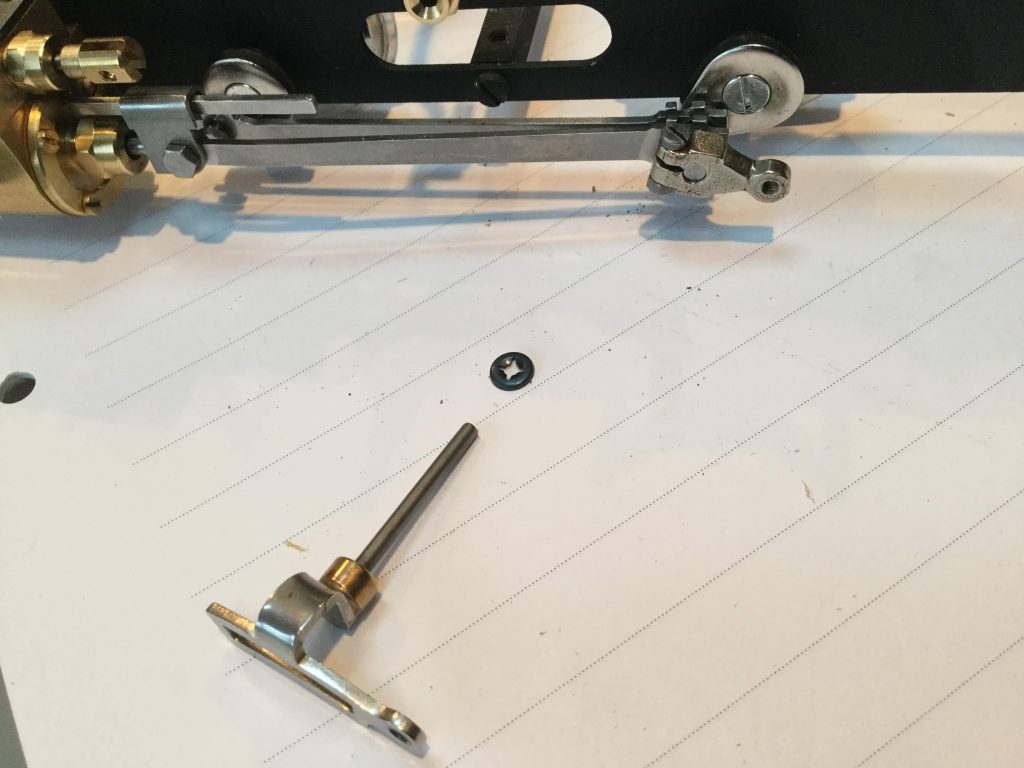
All was going well until the step that involves installing starlock washers onto the axles behind the expansion links. The expansion link has an angled bit (see front of the picture below) which I don’t want to bend. The starlock washer is supposed to go on the other end. But I could not get the blasted thing on the axle.

It has to be installed when the link is already mounted in its bearings in the frame: the starlock washer holds the expansion link in place. So it’s got to be done in situ.

I emailed Roundhouse for advice. They suggested using a block of metal with a hole in it behind the axle. I’m not ready to start metalwork, and my feeble fingers aren’t up to the job. I realised I would need some form of clamp. So I gave up for the evening and went to bed.

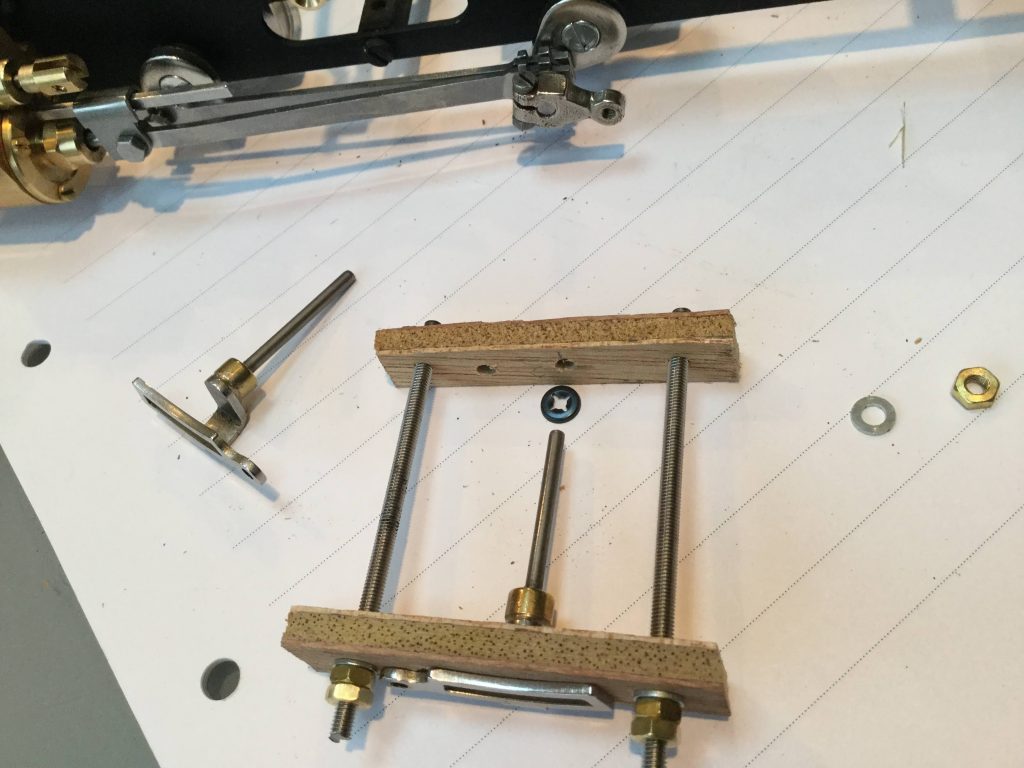
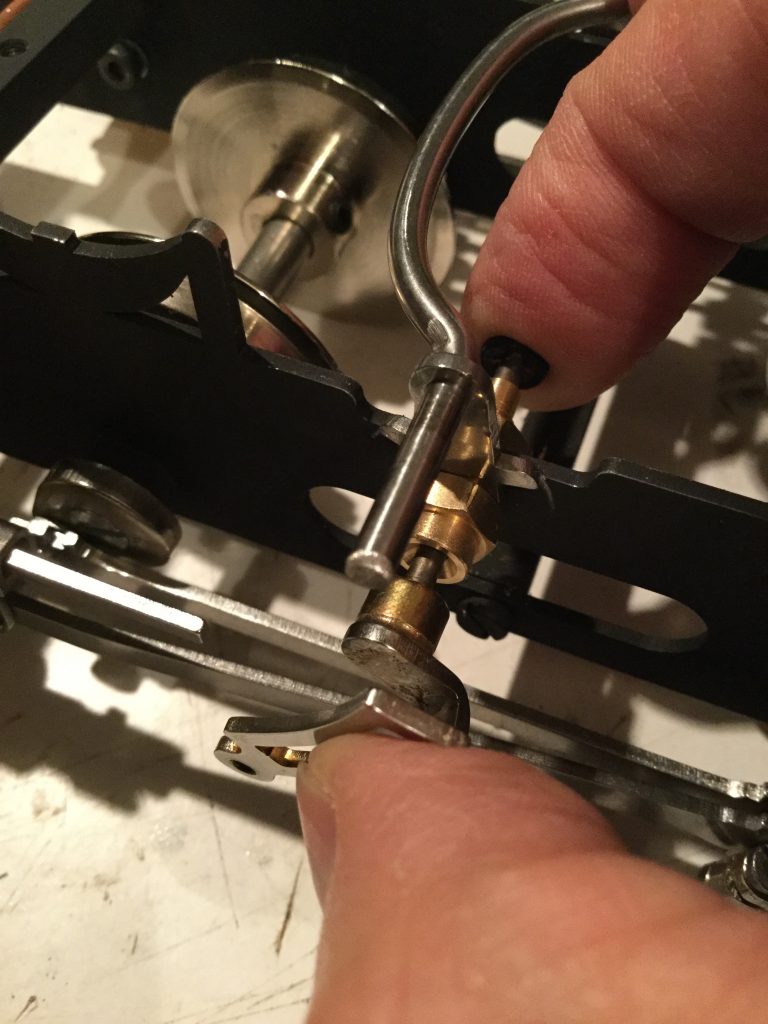
Divine inspiration came whilst trying to get to sleep, and an idea for a simple clamp popped into my head. Here it is (one expansion link is shown here in the clamp, the other link is to the left so you get a better idea of what it looks like).

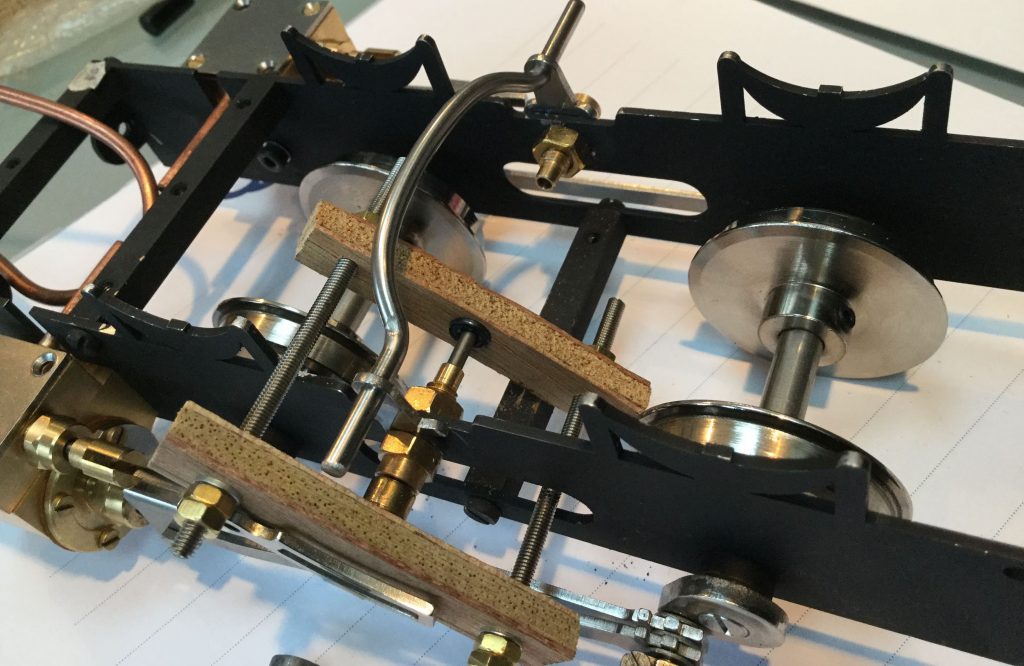
It is made of two pieces of plywood approx 10mm x 45mm, and two lengths of M3 threaded bolt (M3 because I happen to have some). The ply is 5mm thick, chosen to fit inside the angled bit of the expansion link. Holes are drilled in strategic places for the bolts and as a gap behind the starlock. By tightening the nuts, the starlock washer should hopefully be forced onto the axle by the plywood. This was prototype 1 of my clamp, and I expected it to break. I would rather the failure happened on my clamp, rather than on the parts for my loco.

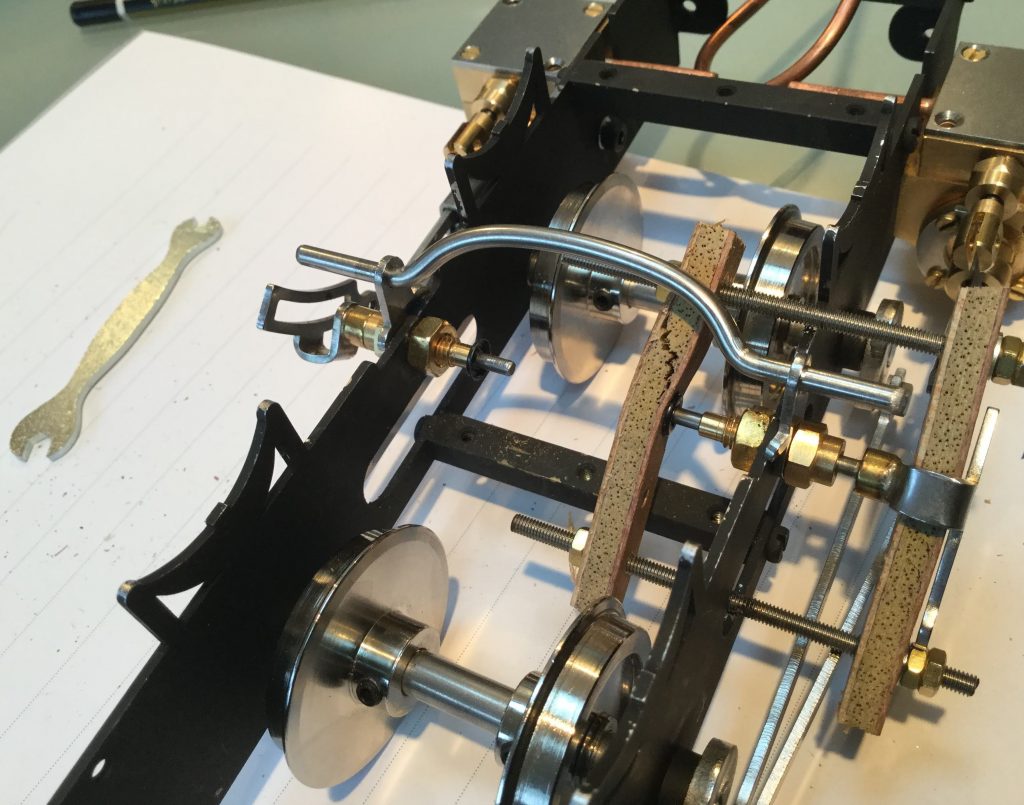
I started to tighten the nuts. Success! The starlock is forced onto the axle.

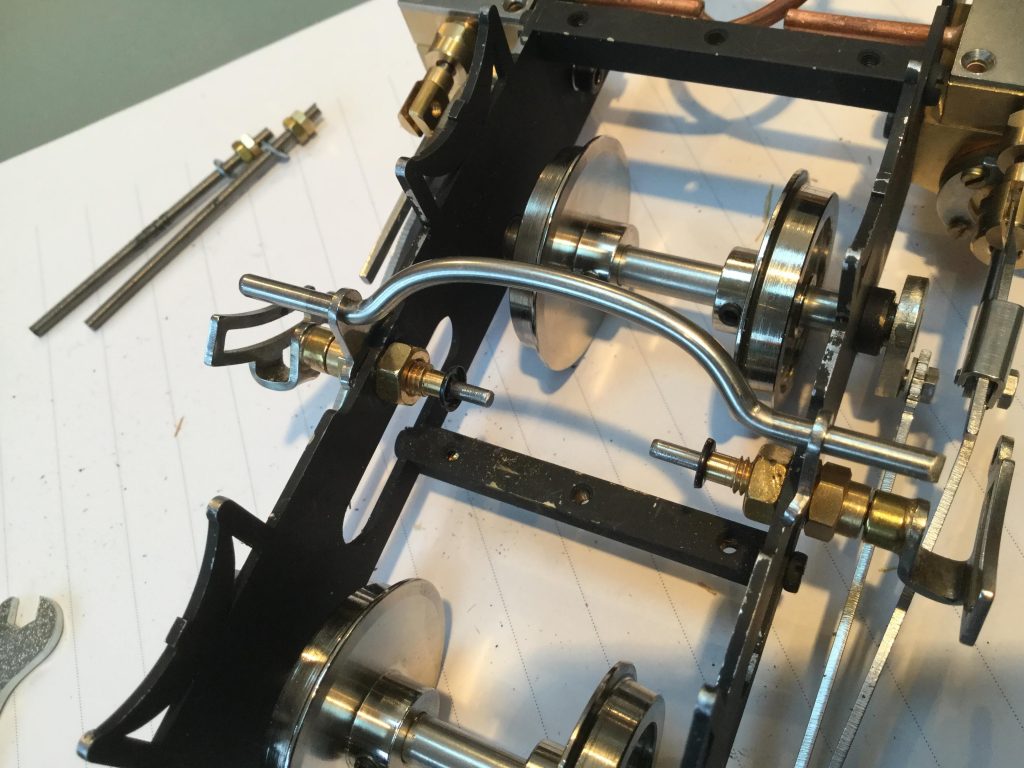
The starlock is really quite resistant to being installed, and the clamp wasn’t very happy, bending precariously. But it did the trick. Once the washer was on the axle, I dismantled the clamp, and used the pieces of ply between my fingers to ease the washer into place, using a carefully cut up train ticket as a spacer between the washer and the bearing to make sure it isn’t too tight.

Success! Now to get my head around Walshaerts Valve Gear.

Posted in 16mm, Garden Railways, Trains | Tagged , , , | Comments Off on Starlock Washers

Model Railway scales

Left to Right:

  • 16mm/ft (1:19) Baguley-Drewry Diesel loco (Accucraft)
  • O Gauge (1:32) Ruston (Triang Big-train)
  • OO Gauge (1:76.2) Duchess of Sutherland
  • N Gauge (1:148) 0-6-0 Steam loco (Fleischmann ?)

more detail here: https://www.wis.co.uk/andy/16mm/scale-and-gauge.html

Posted in 16mm, Garden Railways, Trains | Tagged , , , | Comments Off on Model Railway scales

Launching Windows programs on AWS

A friend of mine is using Studio 2.0 from Bricklink to create digital models in Lego. He is particularly interested in rendering (creating real-looking images of models that only exist in the computer). The models are complex, and include transparent bricks, and his poor home computer isn’t up to the job. How difficult is it to run a Windows machine in AWS, to do the rendering “in the cloud”?

It’s easy to create Windows instances via the web-based AWS console. This page in the documentation explains how. The “t2.micro” instance size (1 GiB RAM and 1 vCPU) mentioned in the documentation will cost about 1.7 US cents per hour (depending on region) (or it might be free) including the licensing cost of Microsoft Windows.

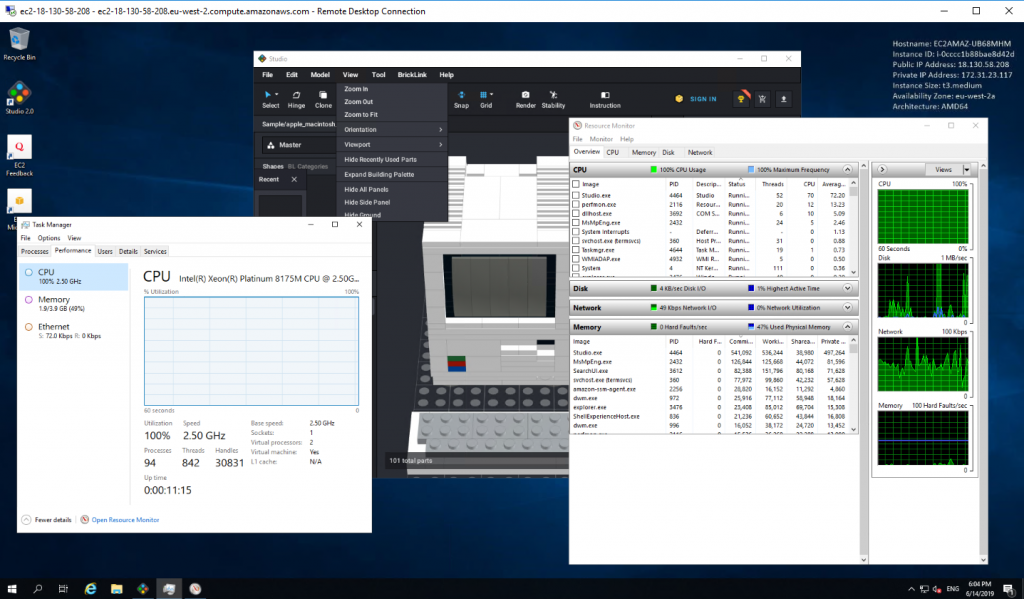
Running a Windows instance with 1 GiB RAM and 1 vCPU (usually one thread on one core – see documentation) is going to be interesting. Most Windows users are familiar with Windows needing 8 GiB RAM to do something useful. After installing Studio 2.0, I attempted to run it, and it failed to start. Guessing that RAM was the issue, I stopped the EC2 instance and changed the instance type to t3.medium. This has 2 vCPU and 8GiB RAM. Then I launched Studio 2.0, opened one of the demo models, and opened the resource monitor.

Bricklink Studio 2.0 running on Windows Server 2019
on AWS t3.medium with 8 GiB RAM and 4 vCPU

When Studio 2.0 is doing nothing, it maxes out both vCPU. With this model, Windows uses less than 2 GiB RAM. Time to switch instance types again:
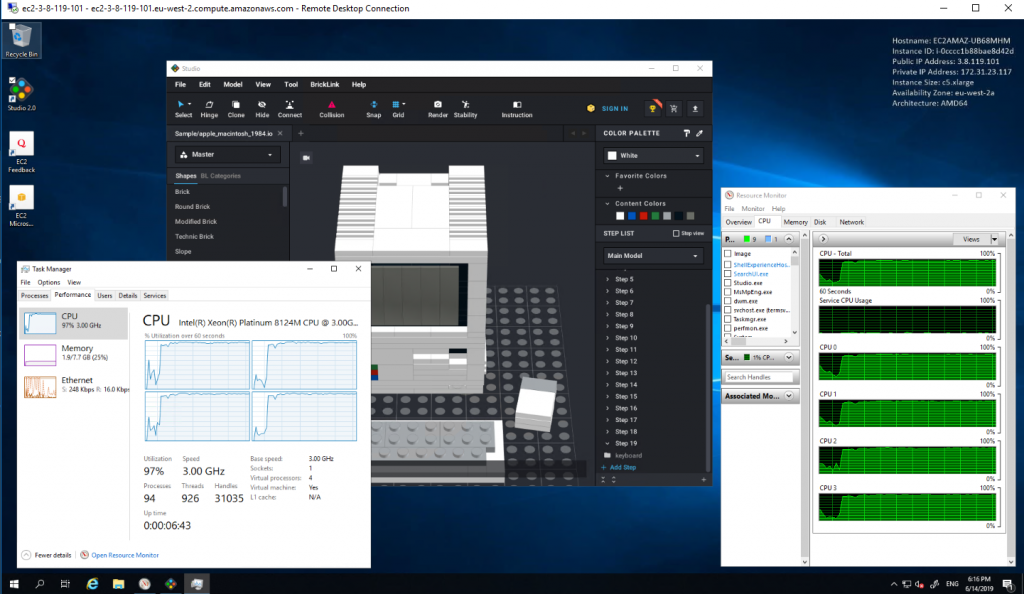
I tried c5.xlarge which has the smallest amount of RAM (8GiB) for 4 vCPU. A restart, a new RDP file, log in again, launch Studio 2.0 and open the resource monitor.

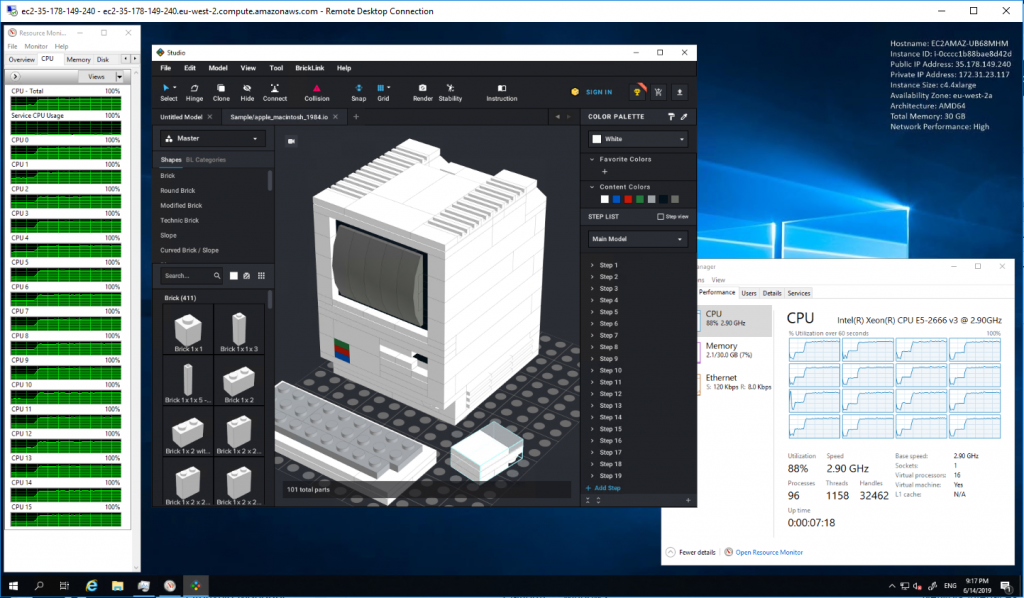
When Studio 2.0 is doing nothing, it maxes out all four vCPU. Time to try more cores. I tried the c5.4xlarge. New accounts have a service limit of zero for this instance size. Increasing the service limit is straightforward, but can take an hour to propagate. Instead I tried the c4.4xlarge (previous generation) instead. It has 16 vCPU and 30 GiB RAM.

Studio 2.0 was happy to consume 88% of all 16 vCPU , even when apparently doing nothing.

Over the course of these tests, I also tried the render options, which was the original idea all along, rendering the simplest static image test (not an animation) for this demo model.

The c5.xlarge   (4 vCPU) took 2min57sec to render the frame. 
The c4.4xlarge (16 vCPU) took 0min55sec to render the frame.

How much is all this costing me? Most of these instance types don’t qualify for Free Tier, so I’m incurring real cost. Windows instances are charged per hour or per part-hour. These tests typically took 10 minutes per instance type. Looking at London prices with Windows:

t2.micro    (1 vCPU and  1 GiB RAM) : $0.0178 per Hour 
t3.medium (2 vCPU and 8 GiB RAM) : $0.0656 per Hour
c5.xlarge (4 vCPU and 8 GiB RAM) : $0.386 per Hour
c4.4xlarge (16 vCPU and 32 GiB RAM) : $1.686 per Hour
EBS volume: 30 GB * $0.116 /GB-month : about $0.02 for 5 hours.
------------------------------------------------------
Total cost : : $2.18

Notes:
* c5.4xlarge is cheaper : $1.544 per Hour

Further work involves automating the build of the machine using CloudFormation, and testing a render using a graphics-card instance.

Justin – June 2019

Posted in Computing, Lego | Tagged , , , | Comments Off on Launching Windows programs on AWS

3D print settings – Dremel 3D20

I have a Dremel 3D20 printer. It uses proprietary software, which has some limitations

  • Dremel Idea Builder will load 3D files in .STL and .OBJ format, and will write them to the 3D20 via USB cable. Idea Builder has limited slicing features, and doesn’t allow the addition of supports or rafts. It can read proprietary .g3drem files and .3dremel files.
  • Dremel Digilab Slicer is a restricted version of the open-source Ultimaker Cura slicing tool. Strangely it cannot write .g3drem files or .3dremel files. But it can write .gcode files (a standard across 3D printers and other machinery).
  • With the latest firmware, the 3D20 printer itself does understand .gcode files, and will read them properly from its SD-card reader (but not via USB).
  • The full version of Cura is free, it is awesome, and there is a plugin that writes to .g3drem format.

The most efficient workflow seems to be to load STL or OBJ files into Cura, slice and edit there, save as .gcode or .g3drem, copy the file to an SD card, and plug that into the printer. There is no need to have a laptop connected to the printer.

Cura also allows fine control of a range of settings for each print, including the layer height, the density of infill in “solid” parts, the speed of the head, etc. For my first print of Lego-compatible helical gears, I used the standard settings: 0.15mm layer height, 10% infill, 200 degrees temperature, 6.0mm per second print head speed. Then I re-read the Thingiverse page from the creator of these objects: he suggests using 0.1mm or 0.05mm layer height and 40% to 100% infill.

  • the first attempt was adequate, but didn’t mesh very well.
  • the second attempt meshed reasonably, but the teeth stripped within a minute when I attached a motor.
  • the third attempt awaits a Saturday when I can re-print the gears.
Posted in 3D printer | Tagged , , | Comments Off on 3D print settings – Dremel 3D20

3D printing gears

Back in March, I determined that using a raft was a waste of time. I tried printing some Lego-compatible helical gears, and this happened.

First attempt at printing a gear-wheel

The first layer wasn’t adhered sufficiently to the bed. The print head was merrily depositing further PLA, but the gear was no longer fixed to the bed and was fixed to the print head instead.

Back to Cura, load the model, add a raft, re-slice, and save as g3Drem, then import back into Dremel3D and upload to the printer. After a few minutes, I noticed that the raft wasn’t adhering to the bed. I tried to correct the problem by pulling the non-suck threads out the way .. but they just got entangled in the head, and I ended up with a mess.

“Stop fiddling with it”! I said to myself, and started it again.

The not-quite-stuck filament that you can see on the right was OK, and the raft printed adequately, and after a few minutes, the gears started to emerge.

The final thing looks like this:

There’s a bit of stringy-ness as the print-head moved back to “home”, but I’m satisfied that the raft was a good idea.

The gears separated from the raft cleanly. I mounted them in a frame to try them out, and they work. Play the video below to see them in action.

IMG_1167.MOV

Posted in Uncategorized | Tagged , , | Comments Off on 3D printing gears

England’s weird place names

England has some of the weirdest place names. Until recently, my favourite was Dial Post. Yes, there really is a place called Dial Post, and anyone familiar with the A24 south of Horsham will have seen the signs.

image from Google Streetview (not taken whilst driving)

Someone I knew at school came from a place with the glorious name of Kingston Bagpuise. The name, like so many weird English place names, is a corruption of the French. Just like Biggleswade is a corruption of the more exotic Old German.

But my favourite so far has to be this one from the Cotswolds. Outdone by Lower Slaughter (probable inspiration for The Hobbit), Stow-on-the-Wold (famous for a battle in the English Civil War) and Cirencester (apparently pronounced “siesta” by locals), we found this on a signpost.

Image from Google Streetview (not taken whilst driving)

Guiting Power. Is that a Chinese energy company? No it’s the real name of a real village, which has had a small population for over 1000 years. The name is derived from Saxon, or Old French, or both. We haven’t found out how to pronounce it yet.

Posted in Uncategorized | Comments Off on England’s weird place names

My Commute Carbon Footprint

(A quick back-of-the-envelope calculation)

I’d like to know how much CO2 I’m putting into the atmosphere from my commute.

I recall that I fill up about twice a month, and the petrol tank usually takes about 40 litres each time. I could work out the MPG, but this is a quick estimate. It’ll do for now.

Burning Petrol releases about 2.31 kg per litre (according to
https://people.exeter.ac.uk/TWDavies/energy_conversion/Calculation%20of%20CO2%20emissions%20from%20fuels.htm)

Therefore, in a month, 2 tank-fulls, or 80 litres burns into…

80 × 2.31 = 184.8 kg of CO2

Taking holidays into account, let’s assume I do that commute for 11 months of the year, which means my commute looks like

184.8 × 11 = 2032.8 kg, or just over 2 tonnes of CO2

There we go. 2 tonnes. The next challenge is to try to reduce it.

According to this article at The Guardian, manufacturing a small to medium sized car might produce 6-17 tonnes of CO2, which I need to factor in when deciding whether to replace the car

Note: My internet-based research said a car probably emits 4.6 tonnes, according to https://www.epa.gov/greenvehicles/greenhouse-gas-emissions-typical-passenger-vehicle. My car does less than the average mileage, and I get better fuel economy than the 22mpg stated in the epa.gov article, so I’m comfortable with the figures I’ve calculated.

Posted in Uncategorized | Tagged , | Comments Off on My Commute Carbon Footprint

AWS Logging (or “why am I being charged for free-tier S3?”)

I have an AWS account. I created it less than a year ago, so I get some free stuff with the account. In the billing dashboard, I was somewhat concerned to see this:

It is only 5 days to the end of the month, but I thought I hadn’t uploaded that many objects to S3, and wondered where this was coming from.

A few weeks ago, I was exploring AWS CloudTrail, which logs every API call, and I had set it up to store data for some later analysis. Now seemed like a good time to do so. I also wanted to explore AWS Athena, which is AWS’ implementation of Presto as a service, and allows you to run SQL queries directly on your S3 content (without having to import it into expensive Redshift, or elephantine EMR).

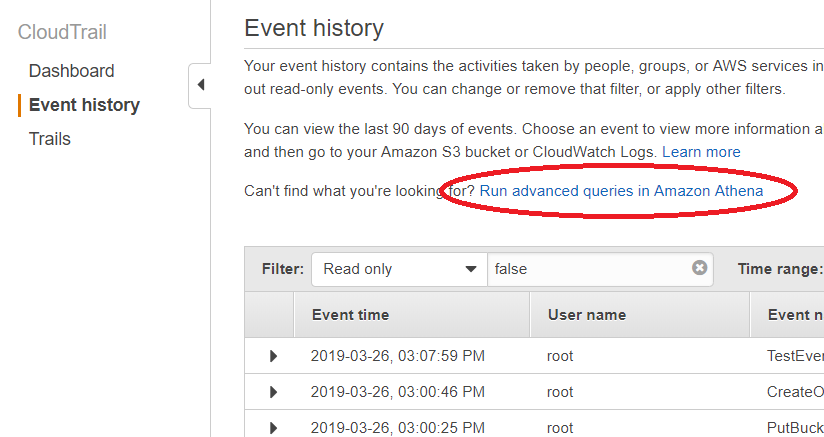
On the Cloud Trail interface is a handy link to Athena: it’s like they WANT you to use it:

Clicking that link starts a simple wizard that creates the “External Table” in Athena pointing to the S3 bucket where your CloudTrail logs are stored. This table tells Athena how to find the CloudTrail data, how to interpret it, how to read it, etc. The syntax is familiar to anyone with a background in SQL, and the details are familiar if you have dug into the depths of Apache Hive (SQL-on-Hadoop).

Within a few minutes, and following some tutorials, I had a query running that counts the number of API calls on an S3 bucket. Here is the code:

 SELECT count(useragent) as QTY, eventname, sourceipaddress, awsregion
FROM my_cloudtrail_logs
WHERE
requestparameters LIKE '%my-cloudtrail-logs-bucket-%'
GROUP BY sourceipaddress, eventname, awsregion
ORDER BY QTY DESC
LIMIT 5;

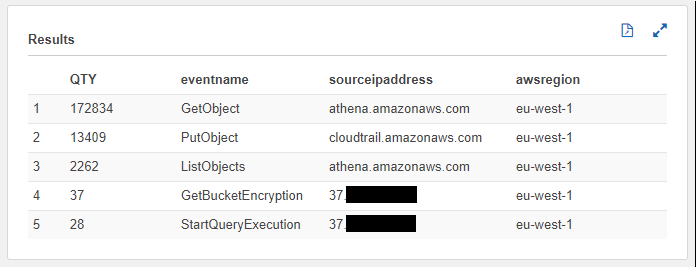
This code gives the top 5 combinations of event-name, sourceIP and region. Here are the results:

We learn several things from this exercise:

  • The culprit, the reason I went over my Free Tier limit for S3, is in fact CloudTrail. It has put over 13,000 objects into an S3 bucket.
  • I should also be concerned with the top row: Athena doing 173,000 “GetObject” calls to parse my data. That count increased to 202,989 the next time I ran the script. Row 3 has similar behaviour.
  • The source IP addresses in lines 4 and 5 are my own. No concerns there.

The big money question: how much did the Athena script cost to run?

  • Athena charges: $5.00 per TB scanned. The Athena console says it scanned 35 Mb, so the Athena cost is $0.00017
  • S3 charges: $0.0004 per 1000 GET requests, which is about $0.08.
  • Incidentally, those PUT requests from CloudTrail cost a further $0.07.

Closer inspection of the log files suggests that CloudTrail is logging API calls made by CloudTrail when it writes to S3, which it writes to S3 … CloudTrail added over 170 new objects the next time I ran this query! Time to modify my configuration of CloudTrail.

Justin – 26 March 2019

Posted in Computing, Programming, System administration | Tagged , | Comments Off on AWS Logging (or “why am I being charged for free-tier S3?”)