A Novel Construction Material
A Garden Railway loco in Lego.
(Originally written for the AWNUTS Garden Railway Society magazine, Spring 1999.)
I don't know whether the loco in this article is Wimsey, Childishness, or just a bit of fun. I'll let the reader make up their own mind. The project started out as a prototype, as I had some (okay too much!) LEGOTM around, and I've yet to master plastikard, solvent and acrylic paints. I built a simple body, just to see what it would look like, and to my surprise it looked really good.
The loco (it doesn't have a name yet) has been through several revisions so far, and being made of LEGO, it will probably change a few more times yet. So far, all the revisions have been improvements on the previous version. Very recently, it has even acquired a rake of wagons to pull, which I shall talk about in a later article, if anyone's interested in a sequel!
Click on the photos to below to enlarge.
|
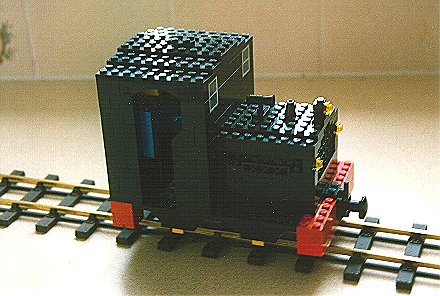
The original locomotive |
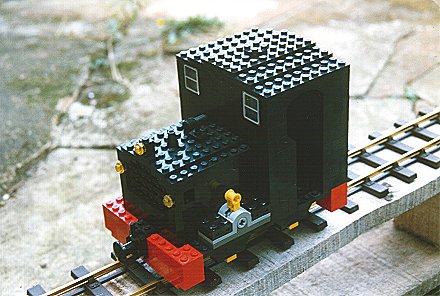
Mk II showing Brandbright Chassis |
Mk II showing LEGO Switch |
|
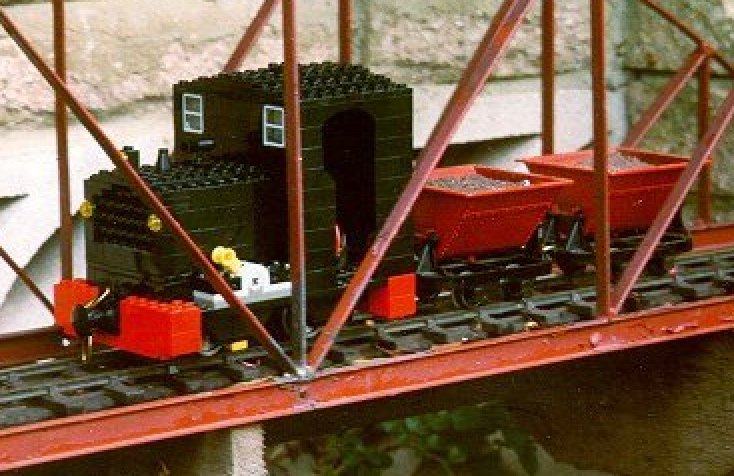
Mk II in Harwich |
A Zoom-in of the above |


Construction
The loco was built around a simple chassis from Brandbright. This is a U-channel of steel, to which are attached a motor and two axles, one of which is driven via a worm drive. The chassis has two holes drilled, one at each end, for the purposes of attaching the bodywork.
I cut out a piece of plywood to the size of a LEGO board, as accurately as I could, and bolted this to the chassis. The LEGO bodywork is then constructed around this. The board is actually the shape of a fat cross (or to think of it another way, it's a LEGO board with a cutout at each corner. The reasons for this are lost in the mists of history, but there was a good reason for doing it when I had the coping saw in my hand at the time!
The initial bodywork design was based around what I thought a small works diesel locomotive should look like. (If the truth be told, I looked at the Diesel locomotive in the "Thomas The Tank Engine" range, and based my ideas on on that, improving on the design where I thought things should be done differently). My loco has got a cab, containing a person, and a bonnet which conceals the motor.
Mark I
In the first revision the electrics were just lying in the floor of the cab. These consisted of a small switch, which I thought could probably be fixed into a LEGO brick somehow, and a small battery box holding two rechargable AA batteries.
The bonnet is removable, by virtue of flat bits of lego without studs. I've also tried to add detail, inspired by a trip to Legoland UK. The radiator grille is made of lots of little "handlebar" shaped pieces. I found some clear yellow bits and made some "headlights". No, they don't light up in the dark. Yet. There are also some "lumps" on one side of the bonnet, which are intended to look like the things you might find on a diesel locomotive. Goodness knows whether they're right or not. Maybe one day I'll look at an 08 shunter and do it right...
One thing that I was really pleased with was the buffers. Using some clever bits of LEGO, with studs on the sides, I created a single centre buffer with a hook above it (the photos show this quite clearly). When I offered the new loco up to an SM32 coach I was making, I was surprised to see that the buffer was at exactly the right height (24mm above the rails) as suggested in the SM32 handbooks. Not that I'm advocating rules or anything...
Mark II
I discovered that LEGO do a double pole switch, designed to make a motor run forwards or backwards. Ideal, I thought, and ordered one from LEGO UK, along with a short cable. The LEGO electrical system is really clever. The cables connect together using a 2x2 plate with metal contacts strategically placed so that it's impossible to create a short-circuit. I cut the short cable in half, which provided me with a connection for each side of the switch. One half is soldered to the motor, the other to a battery box connector.
At the same time, I made a few modifications to the detailling. The bonnet was completely rebuilt and lost its detailling on the side, as the switch was in the way.
The photograph on the bridge is of the loco at this stage, the bridge belongs to Michael Woodward's Garden. I took the loco along in a box. I wasn't going to get it out if people were counting rivets. However, Paul Willets was there, with a fun little loco, and his wife had a sweet little Emmett-style thing, so my Lego Loco made it's first public appearance. I had intended to eventually build a "real" bodywork for the chassis, but everyone seemed to like my new machine, so it stayed together. Michael kindly offered me some Binnie hoppers to pull for the occasion.
Mark III
I decided that two AA batteries, carried loose in the cab, were a liability, and also didn't provide much power, so I set about working out how to get two larger batteries into the locomotive. This involved some major surgery to the back of the cab, so that a battery-box for two 'C' cells would fit. The battery box is nicely rounded at the top, so I made the hole a similar shape with some sloped LEGO bricks. The battery box slides in by virtue of some LEGO without the studs, and there are some guides along each side to stop the battery box sliding sideways. Unfortunately for the driver, I also had to amputate one of his legs to fit the battery box. Good job he wasn't in a Union! So that he doesn't fall over (or apart) his back is tied to the back wall of the cab, his head is fixed to the ceiling (by virtue of the fact that he's the same height as the inside of the cab, and therefore the studs on his head are attached to the roof). He gets a hard deal out of this. But he is still there.
I took the loco to Dave Marshall's line for his Christmas Lights extravaganga. We managed one lap of the garden, and all the kids thought it was wonderful. Unfortunately, it was about 3pm, and the light was already fading, so, the loco being black, and the headlights being only decorative, we got banned for the rest of the day on the grounds that we couldn't be seen. We went inside and had some mince pies instead.
MARK IV
I finally got around to building something for the loco to pull, about which I shall ramble further in my sequel. Once I'd tidied up all the LEGO from the floor, and reached under the sofa for all those little bits that roll there by themselves, I set the train off around my (as yet incomplete) garden line, and it came grinding to a halt at the first stray blade of grass.
The problem was a complete lack of traction in the Locomotive. Steam and Diesel Locomotives have an enormous amount of steel over the wheels, and in the case of the former, a huge great water tank called The Boiler, as well. This weight means that between the unlikely combination of steel wheels and steel track, there is a reasonable amount of friction, which causes the train to move (you knew that anyway). If you replace all that steel with a small amount of LEGO, which is hollow ABS, and have a tiny little 3-volt motor instead of an internal combustion engine, you end up with no weight over the wheels and therefore no friction. I was actually worse than that, because the batteries were behind the rear (unpowered) axles, giving the loco a "wheelie", especially if it was pointing up-hill. The wheelie effect was even noticeable on a 1:50 gradient, which, on a narrow gauge railway, is more or less level!
To fix the problem, I made use of the fact that there was a reasonable amount of spare space around the motor, inside the removable bonnet which I had rebuilt for Mark II, and constructed a lead weight to fit inside. Wrapped in electrical insulation tape for safety (lead's nasty stuff yer know), it now provides enough downward force to haul the wagons up the 1:50 when pointing forwards.
FOOTNOTES
The coach, featured in the notes on Mark I, hasn't been finished. It's still at the same stage of construction that it was at when I tested the buffer height, proving that I'm no good at painting, and that using LEGO was a good idea.
My son is 1 year old this summer (1999). It won't be long before he gets some LEGO for Christmas, and then the loco and wagons will get rebuilt and go multi-coloured, like all good childhood LEGO models!
There isn't much more I can do to perfect the locomotive now, so it'll probably be the working headlamps next. The only other problem is that the batteries can slide out, so I might have to devise a way of keeping these in...
Andy Watkins © 1999-2007